I have now worked on 3 separate latch hook projects created by the Grid Designer, all of these worked on 5 mesh canvas. I have learned some things in the process, so I wanted to share those as a review of the available tools and canvas for 5 mesh latch hook rugs.
Before this I had only worked projects that came in kits, so it has been an adventure to purchase my own latch hook canvas and create and work my own designs.
I have been working with 5-mesh latch hook canvas (5 holes per inch) and Herrschner’s Pre-cut Latch Hook Rug yarn. I love the dense, soft feel of the rugs worked at this tighter mesh and, when digitizing a photo, I can get more detail into the rug using a 5 mesh canvas, as opposed to the common 3.75 mesh.
In working these projects, though, I have learned to be cautious about the latch hook tool and the canvas quality. In this post, I will share with you what I have learned so far.
Latch Hook Canvas Quality
First, I’ll discuss latch hook canvas quality. I found extreme differences in the two 5 mesh canvases that I purchased.
Color Crazy 5-Mesh Canvas
For my first project, the Children’s Latch Hook Name Rug, I purchased latch hook canvas from Color Crazy through Amazon. It looked very consistent with the latch hook canvas I had seen described in other blog posts.
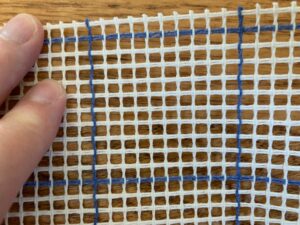
This is what latch hook canvas is supposed to look like. If you look closely you will see that the strands running vertically are twisted, and the strands running horizontally are flat and not twisted. It is these flat, non-twisted strands that you want to hook the yarn onto.
I have seen various reasons for this posted on the internet. Some say your project will not look uniformly worked if you don’t do this.
I have noticed myself, that when inserting the latch hook into a hole under a flat strand, the hole can expand to the right and left as the twisted strands will slide over a bit, giving a bit of flexibility to the width of the hole as you are working it. So, my personal thought, is that you will get less breakage of the strings in the canvas when you work it this way. That’s just my guess, though.
In any case, this is the generally accepted way that latch hook canvas should look.
When I worked the Children’s Latch Hook Name rug, I worked the yarn onto the flat strands. I used a regular 3.75 mesh tool, purchased at Michaels (Caron), which was a bit too large for the canvas holes, but I had no problems. No strands broke.
JoAnn Fabric “Dimensions” 5 Mesh Canvas
I then started work on my Apple Latch Hook Rug. This was to be a very large rug that I planned on using as a wall hanging above my bed. Looking around, I found 5 mesh canvas on JoAnn Fabric’s website, brand name “Dimensions”. This was significantly less expensive than what I had purchased at Color Crazy, so I thought I had found a bargain! But, as they say, you get what you pay for!

The Dimensions canvas is not built in the same way as the canvas from Color Crazy. Looking at it closely, there are no completely flat strands in either direction. The strands that run vertically in the picture are more loosely and obviously twisted. However, the strands running horizontally in the picture are still twisted, although they are twisted more tightly.
I found this confusing, but I began to work on the less obviously twisted strands, the ones that run horizontally in my picture. Unfortunately, it wasn’t long before I experienced breakage.
I noticed that the breakage occurs most often on the blue horizontal threads. These appear to be either a single blue thread or a tightly twisted pair of blue threads, where the blue thread is not as thick as the white threads.
As I worked, I repaired the breaks by stranding my own thread back and forth across the break with a needle. But, then I also started experiencing breaks with the white threads also.
I had made it to maybe 5 rows or so, and then decided I had to do something else.
Latch Hook 5 Mesh Tools
At this point I started looking for 5 mesh latch hook tools. I knew I had seen them…. somewhere. I had no problem using my larger latch hook on the 5 mesh canvas from Color Crazy, but now I was thinking that my standard 3.75 mesh latch hook was just too large for this delicate Dimensions canvas.
Herrschner’s 5 Mesh Latch Hook Tool
So, I searched around and found a 5-mesh latch hook tool on Herrschner’s website. I thought, this has to be what I need and purchased it.
I was disappointed. This 5 mesh tool did have a squashed hook that was smaller than my original tool. It appeared to me that they simply took a regular latch hook and did nothing but squash the hook at the end of the tool.
This did not work any better than my original 3.75 mesh tool. The shaft size was still too large and when the latch hook was all the way open, it was still really difficult to push the tool through the small 5 mesh holes. It was still causing breakage, maybe not quite as bad, but still it was an unworkable solution for me.
Now I had about 14 rows done.
I was frustrated. I worked another project, the Shady Daisies Latch Hook Rug. I went back to using the canvas from Color Crazy for this project and again, I had no problems. It worked up very quickly and easily. The canvas is very durable, no breakage at all.
At this point, I thought I would have to rework my 14 rows on Color Crazy canvas and I posted this on my WIP posting for the Apple latch hook rug. I put it off though, because I absolutely hate to have to rework things.
Color Crazy 5 Mesh Latch Hook Tool
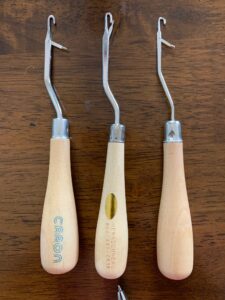
Again, I went looking and found a 5 mesh latch hook tool at Color Crazy. I ordered it, but, I thought I might get the same tool that I ordered from Herrschner’s.
It was not the same though! It was significantly better. This tool was not just a quick modification of the normal-size tool. It has a smaller shaft and hook. Finally, something really designed for 5 mesh!
So, I thought I would try this on the JoAnn Dimensions canvas and continue to work my Apple rug without changing the canvas.
Since I had particular difficulty with breakage of the blue row threads, I first reinforced them by working some heavy duty thread around and along the blue horizontal lines in the canvas.
Reinforcing Dimensions Canvas
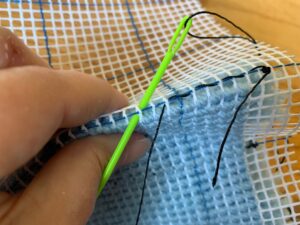
I just used a tapestry needle and tied the thread to the canvas at the end of the row. Then I stitched around the blue thread, putting the needle through the canvas every two horizontal threads.
With the reinforcement, and the new smaller hook from Color Crazy, I am now continuing to work the Apple rug.
I have made it to 40 rows (as I am writing this) and no additional breakage. It’s possible I don’t need the reinforcement, but I am not going to test that. I’m just going to continue to work it this way.
More Canvas Issues
Never will I ever buy the Dimensions canvas off of JoAnn’s website again. In fact, I encountered more irregularities with the canvas as I continued to work. At some places in the canvas, the horizontal and vertical strings are not attached at all! Something seems wrong with their weaving process.
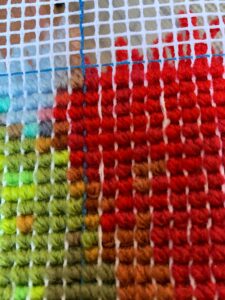
This caused the horizontal stitches to pull forward so that I needed to work 2 yarn strands on one loop of thread. It will not stop me from finishing but is another indication of the poor quality of the JoAnn 5 mesh canvas.
Here’s a picture of the back in the area where the problems are occurring. You can see the long white vertical strands at places. These strands were not attached to the horizontal threads in multiple places.
I wasted so much time with this canvas.
The Moral of the Story
So, the moral of the story is again, you get what you pay for! There are significant differences in canvas quality and latch hook design. At this point, I would highly recommend the canvas and 5 mesh tool from Color Crazy. The cost is more, but the quality is night-and-day different.
UPDATE: I have since tried out the Zweigart 5 mesh (5 holes/inch) canvas from Tracy’s craft shop in the UK. This is also quality canvas. This is also a very good place to purchase from. Here is the link: https://www.tracyscraftshop.co.uk/canvas-latch-hooking-c-69.html.
Perhaps you have a similar story to tell? Let me know if you have learned about particular products to avoid or products that you really like.
More Info
See the Overview playlist on youTube for more information on the Grid Designer.
If you are ready to start the Grid Designer to create your own project, click here.
As always, if you have any questions or comments, leave me a message below or go to my contact page to email me.
Hi,
I wonder if you be so kind as to advise me, I am looking to purchase Latch Hook canvas/mesh, but I am looking for a type that is softer and more pliable, similar to the type that is sold on plain Latch hook cushions on sites such as Amazon.
I have tried to find this out everywhere, and you are my last hope!
Thankyou in anticipation.
Pamela
Hi Pamela,
I don’t really have an answer for you, unfortunately. I have seen your question come up in latch hook groups on facebook and people suggest that you “work” the canvas a bit by folding it back and forth to loosen it up. Everything I have used is pretty stiff. It usually does loosen up some as you work the yarn in also, but perhaps not as much as you would like. I wish I had a better answer for you on this one.
Good luck in your search.
If you find something, please post back for others, and I can share anything you find on facebook also.
(Please note that I’m using Zweigart canvas as an example because I’ve found this to be the very best available.)
I’ve done quite a lot of latch hooking over the years and the canvas that’s being sold today is much stronger than before – but it’s also much more ‘rigid’, at least at first. But I’ve never known modern canvas to become much more ‘pliable’, or softer if you prefer, after it’s been constantly worked over the life of the project.
I’ve had sore knuckles from them being almost constantly in touch with brand new canvas at the start of a project but it does ease off after a few rows or so.
If you can somehow fix the canvas (to a table for example) each time you start the project that also seems to help the softening process along. You can if you wish roll, straighten, re-roll, straighten and so on (as many times as you want) the piece of canvas you’re going to use back and forth and that can soften it a bit. But it’s simply best to just work with it and it will become much softer as you do so.
One thing – don’t wet it or wash it! It CAN fall to pieces!
Hope that helps.
Thanks Bob, I had wondered what would happen to it if I tried to wash it, now I know.